Showing posts with label Windows Trick. Show all posts

Trick to Modify EXE Files

Cool trick to Modify *.exe files

learn how to change *.exe files, in 5 easy steps:

1) Don't try to modify a program by editing its source in a dissasembler.Why?
because that's for programmers and assembly experts only.

try to view it in hex you'll only get tons of crap you don't understand.
First off, you need Resource Hacker(last version). It's a resource editor-
very easy to use, You can download it at
http://www.users.on.net/johnson/resourcehacker/

2) Unzip the archive, and run ResHacker.exe. You can check out the help file too


3) You will see that the interface is simple and clean. Go to the menu FileOpen or press Ctrl+O to open a file. Browse your way to the file you would like to edit. You can edit *.exe, *.dll, *.ocx, *.scr and *.cpl files, but this tutorial is to teach you how to edit *.exe files, so open one.

4) In the left side of the screen a list of sections will appear.
The most common sections are
-String table;
-RCData;
-Dialog;
-Cursor group;
-Bitmap;
-WAV.

*Icon: You can view and change the icon(s) of the program by double-clicking the icon section,chossing the icon, right-clicking on it and pressing "replace resource". After that you can choose the icon you want to replace the original with.
*String table: a bunch of crap, useful sometimes, basic programming knowladge needed.
*RCData: Here the real hacking begins. Modify window titles, buttons, text, and lots more!
*Dialog:Here you can modify the messages or dialogs that appear in a program. Don't forget to press "Compile" when you're done!
*Cursor group: Change the mouse cursors used in the program just like you would change the icon.
*Bitmap: View or change images in the programs easy!
*WAV:Change the sounds in the prog. with your own.


5) In the RCData,Dialog,Menu and String table sections you can do a lot of changes. You can modify or translate the text change links, change buttons, etc.


TIP: To change a window title, search for something like: CAPTION "edit this".
TIP: After all operations press the "Compile Script" button, and when you're done editing save, your work @ FileSave(Save as).
TIP: When you save a file,the original file will be backed up by default and renamed to Name_original and the saved file will have the normal name of the changed prog.
TIP: Sometimes you may get a message like: "This program has a non-standard resource layout... it has probably been compressed with an .EXE compressor." That means that Resource Hacker can't modify it because of it's structure.

Create One-Click Shutdown and Reboot Shortcuts

Create One-Click Shutdown and Reboot Shortcuts:


First, create a shortcut on your desktop by right-clicking on the desktop, choosing New, and then choosing Shortcut. The Create Shortcut Wizard appears. In the box asking for the location of the shortcut, type shutdown. After you create the shortcut, double-clicking on it will shut down your PC.

But you can do much more with a shutdown shortcut than merely shut down your PC. You can add any combination of several switches to do extra duty, like this:

shutdown -r -t 01 -c "Rebooting your PC"
Double-clicking on that shortcut will reboot your PC after a one-second delay and display the message "Rebooting your PC." The shutdown command includes a variety of switches you can use to customize it. Table 1-3 lists all of them and describes their use.

I use this technique to create two shutdown shortcuts on my desktop—one for turning off my PC, and one for rebooting. Here are the ones I use:

shutdown -s -t 03 -c "Bye Bye m8!"
shutdown -r -t 03 -c "Ill be back m8 ;)!"

Switch
What it does

-s
Shuts down the PC.

-l
Logs off the current user.

-t nn
Indicates the duration of delay, in seconds, before performing the action.

-c "messagetext"
Displays a message in the System Shutdown window. A maximum of 127 characters can be used. The message must be enclosed in quotation marks.

-f
Forces any running applications to shut down.

-r
Reboots the PC.

How Long Has Your XP System Been Running

Cool Trick to find How Long Has Your System Been Running.

Here's how you verify system uptime:

Click Start | Run and type "cmd" to open a command prompt.
At the prompt, type "systeminfo"

Scroll down the list of information to the line that says System Up Time.

This will tell you in days, hours, minutes and seconds how long the system has been up.

Note that this command only works in XP Pro, not in XP Home. You can, however, type net statistics workstation at the prompt in Home. The first line will tell you the day and time that the system came online.

Customising Start Button

Cool trick to customise the start Button.

First you need a tool called "Resource Hacker". This free program allows you to change resources in any .exe file such as "Explorer.exe", which includes the [Start] button's Label. You can visit Download.com and search there for "Resource Hacker".
After you download it, follow the guide here:

Step 1:

A - Run "Resource Hacker" and open the file "%windir%\Explorer.exe".
B - You see a Tree of all Resources in this file, expand the "String Table"
C - Find the "start" and replace it with your own text. then press the [Compile Script] button.
D - Save "Explorer.exe" as "MyStart.exe" DONT save it as Explorer.exe, do "save as.." and give it a new name.
E - Quit "Resource Hacker".

Step 2:

A - Click on the [Start] button and choose the "Run..." item from the start menu. (Or use the shortcut key WinKey+R)
B - Type "RegEdit" in the Run "Dialog Box". And then press the [Ok] buton to run the "Registry Editor" program.
C - Go to: "HKEY_LOCAL_MACHINE\SOFTWARE\Microsoft\WindowsNT\CurrentVersion\Winlogon" and find the "Shell" property.
D - Replace value of the "Shell" property to "MyStart.exe".
E - Quit "Registry Editor".
F - Restart your system.

Note about Registry Editor:
if you did not find the key "HKEY_LOCAL_MACHINE\SOFTWARE\Microsoft\WindowsNT\CurrentVersion\Winlogon", you can search the Registry for the "Explorer.exe", to do this use the Edit Menu | Find Next (Ctrl+F).

Disabling Windows Logo Key

Windows Trick - Disable Windows Logo Key

I was recently playing games and this nasty windows logo key keep annoying me , cause i often accidently clicked it , and i start to search a solution to solve my problem, and found the following article in microsfot website, and it did work, hope this helps, thanks!

Copy the following messages into your notepad and save as *.reg, and use it, then restart the computer.

Windows Registry Editor Version 5.00
[HKEY_LOCAL_MACHINE\SYSTEM\CurrentControlSet\Control\Keyboard Layout]
"Scancode Map"=hex:00,00,00,00,00,00,00,00,03,00,00,00,00,00,5b,e0,00,00,5c,e0,\00,00,00,00

For any queries and Suggestion please comment on this post by clicking comments.

Auto End Tasks to Enable a Proper Shutdown

Auto End Tasks to Enable a Proper Shutdown, Win XP Tweak
This reg file automatically ends tasks and timeouts that prevent programs from shutting down and clears the Paging File on Exit.

1. Copy the following (everything in the box) into notepad.

Windows Registry Editor Version 5.00

[HKEY_LOCAL_MACHINE\SYSTEM\CurrentControlSet\Control\Session Manager\Memory Management]
"ClearPageFileAtShutdown"=dword:00000001

[HKEY_USERS\.DEFAULT\Control Panel\Desktop]
"AutoEndTasks"="1"

[HKEY_LOCAL_MACHINE\SYSTEM\CurrentControlSet\Control]
"WaitToKillServiceTimeout"="1000"


2. Save the file as shutdown.reg
3. Double click the file to import into your registry.

NOTE: If your anti-virus software warns you of a "malicious" script, this is normal if you have "Script Safe" or similar technology enabled.

Create A Personal Screen Saver In Win Xp

Windows tips - Creating a personal Screen saver

This isnt a tweak, but a great little feature!(many would know this) For a great way to put your digital photos to work, try creating a slide show presentation for use as a screen saver. Here's how:

1. Right-click an empty spot on your desktop and then click Properties.

2. Click the Screen Saver tab.

3. In the Screen saver list, click My Pictures Slideshow.

4. Click Settings to make any adjustments, such as how often the pictures should change, what size they should be, and whether you'll use transition effects between pictures, and then click OK.

Now your screen saver is a random display of the pictures taken from your My Pictures folder.

Change The Default Location For Installing Applications

Windows tips - Change The Default Location For Installing Applications


As the size of hardrives increase, more people are using partitions to seperate and store groups of files.

XP uses the C:\Program Files directory as the default base directory into which new programs are installed. However, you can change the default installation drive and/ or directory by using a Registry hack.

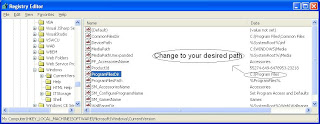
1. Run the Registry Editor (by typing 'regedit' in Run command)
2. go to HKEY_LOCAL_MACHINE\SOFTWARE\Microsoft\Windows\CurrentVersion in Registry Editor
3. Look for the value named ProgramFilesDir.
4. By default,this value will be C:\Program Files.
5. Edit the value to any valid drive or folder and XP will use that new location as the default installation directory for new programs.

Windows Explorer Tips - Usefull Shortcuts

Windows Explorer Tips - Usefull Shortcuts


Display the bottom of the active window. END
Display the top of the active window. HOME
Display all subfolders under the selected folder. NUM LOCK+ASTERISK on numeric keypad (*)
Display the contents of the selected folder. NUM LOCK+PLUS SIGN on numeric keypad (+)
Collapse the selected folder. NUM LOCK+MINUS SIGN on numeric keypad (-)
Collapse current selection if it's expanded, or select parent folder. LEFT ARROW
Display current selection if it's collapsed, or select first subfolder. RIGHT ARROW

Renaming Multiple Files

Windows XP Tips and Tricks - Renaming Multiple Files

Windows XP lets you rename files in bulk by simply selecting multiple files within Windows Explorer and pressing the F2 key. When you use this feature, the OS applies the name you enter to the first file and applies the same name with a number in parentheses to the other files you selected (the file extensions remain unchanged).

For example, if you select the following files,
* pics.jpg
* notes.txt
* myname.rtf
* music.mp3

and rename the first file (pics.jpg) to sample.doc, XP renames the remaining files as follows:
* Sample (1).jpg
* Sample (2).txt
* Sample (3).rtf
* Sample (4).mp3